

How to Floss Your Teeth: A Step-by-Step Guide for a Healthier Smile
- Caterina Rutter
- Jan 9
- 11 min read

Learning how to floss correctly is one of the most powerful actions you can take to prevent cavities and gum disease. Brushing alone misses up to 40% of your tooth surfaces, leaving the tight spaces between your teeth vulnerable to the plaque that causes dental problems.
This simple daily habit is your best defense against complex and costly dental work. This guide provides the actionable steps you need to master it.
Why Flossing Is a Non-Negotiable for Oral Health
Skipping flossing is easy, but this one-minute habit can save you from fillings, root canals, or even tooth loss. Your toothbrush simply can't reach between your teeth or just below the gumline—the exact spots where food debris and bacteria form a sticky film called plaque.
If not removed within 24 to 48 hours, plaque hardens into tartar, which only a professional dental cleaning can remove. This buildup is the primary cause of tooth decay and gum inflammation.
The Real Cost of Skipping This Simple Step
Ignoring the plaque between your teeth invites problems to develop silently. It starts with gingivitis—red, swollen, or bleeding gums. While reversible, untreated gingivitis can advance to periodontitis, a serious gum disease that destroys the bone supporting your teeth.
A consistent flossing routine is a direct action you can take to protect your smile and avoid expensive restorative treatments.
You Are Not Alone in Forgetting to Floss
If you struggle to floss daily, you're not alone. A YouGov survey found that 52% of Britons and 45% of U.S. adults often forget to floss. The biggest challenge is turning this task into an automatic habit.
Actionable Insight: Don't aim for perfection. Start by flossing just a few teeth each night. Building a consistent habit, even an imperfect one, is what transforms your oral health over time.
This habit also impacts your overall well-being. Poor oral health is linked to systemic health issues. You can learn more about the crucial connection between diabetes and oral health.
While cosmetic options like teeth whitening for sensitive teeth are popular, a truly great smile starts with mastering fundamentals—like knowing how to floss your teeth correctly every day.
Mastering the C-Shape Flossing Method
The single most effective technique is the C-Shape method. This isn't just snapping a string between your teeth; it’s a specific motion designed to wrap around the tooth and clean beneath the gumline where plaque hides.
If you've been using a quick in-and-out motion, it's time for an upgrade. This approach is gentler, more thorough, and easy to learn with these steps.
This guide illustrates the four key actions of the C-Shape method: Measure, Wrap, Glide, and C-Shape.
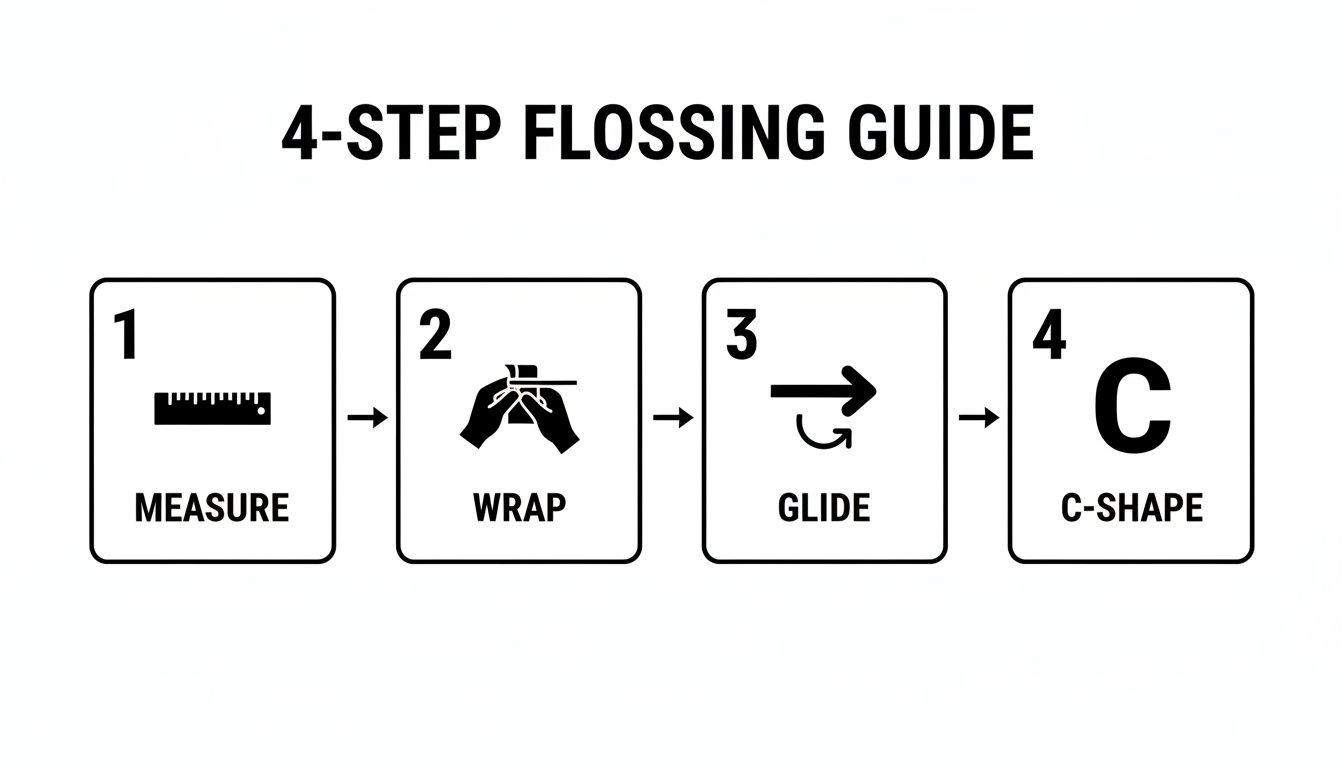
Executing this sequence—Measure, Wrap, Glide, and C-Shape—is the key to having enough clean floss, maintaining control, and cleaning the areas that matter most.
Getting the Right Amount of Floss
Start with the right amount of floss. Pull out about 18 inches—roughly the length from your fingertips to your elbow.
This length is crucial because it allows you to use a fresh, clean section of floss for each tooth. Using the same section repeatedly just moves plaque from one tooth to another. Treat each gap between your teeth as a new area that deserves a clean tool.
Wrapping for Maximum Control
To get a secure, controlled grip, follow these steps:
Create a "Supply" Reel: Wind most of the floss around the middle finger of one hand. This is your dispenser for clean floss.
Make a "Take-Up" Reel: Wrap the remaining floss around the middle finger of your other hand. This finger will collect the used floss.
Establish Your Working Section: Pinch a one-to-two-inch section of floss tightly between your thumbs and index fingers. This short, taut segment is what you'll use for cleaning.
This setup gives you the precision needed to guide the floss without it slipping.
My Pro Tip: As you move between teeth, unwind a fresh piece from your "supply" finger and wind the used section onto your "take-up" finger. This simple action guarantees you're always using a clean surface.
The Gentle Glide Between Teeth
Avoid forcing the floss down, which can snap against your gums and cause damage.
Instead, keep the floss taut and gently guide it between your teeth using a soft, back-and-forth sawing motion. You are easing it into the space, not forcing it. This controlled movement lets you slip past tight contact points without painful snapping. If a spot is too tight, try a thinner or waxed floss for an easier glide.
Creating the Crucial C-Shape
Once the floss is between your teeth, perform the most critical step.
Press the floss against the side of one tooth, wrapping it to form a "C" shape. This "hugs" the tooth, allowing the floss to dip just below the gumline.
With the floss in this C-shape, slide it up and down along the side of the tooth, from just under the gumline to the top. You should feel it scraping away the soft plaque. Then, pull the floss across the gap and form another C-shape to clean the neighboring tooth. Repeat this for every single tooth, including the back side of your last molars.
Choosing the Right Flossing Tool for You
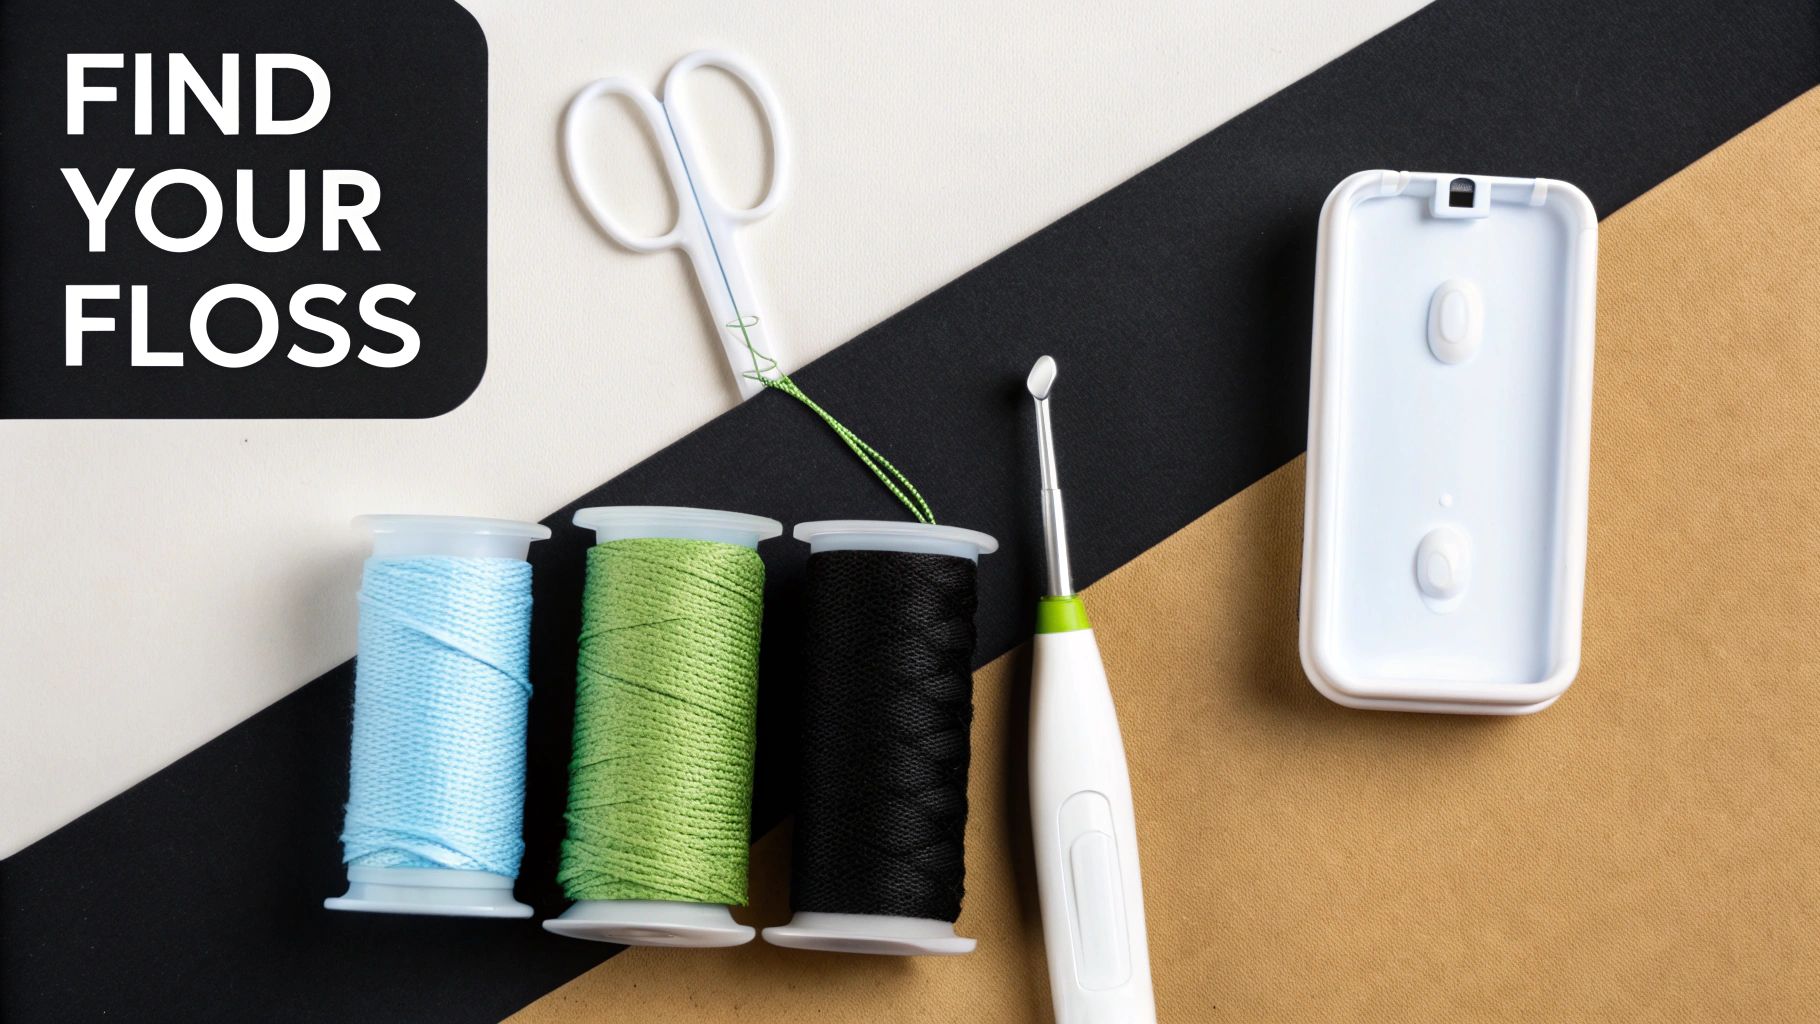
The best flossing tool is the one you will use every day. The concept of cleaning between teeth dates to 1815, but innovation has given us more options than ever. Johnson & Johnson patented the first commercial floss in 1898, nylon replaced silk during WWII, and floss picks were invented in 1963. You can read more about how dental floss became an oral hygiene staple on DeltaDentalCT.com.
Let's break down the top three tools—string floss, floss picks, and water flossers—to help you find your perfect match.
Traditional String Floss: The Gold Standard
Dentists consider string floss the gold standard because its effectiveness, when used correctly, is unmatched. Its key advantage is the ability to form a tight "C" shape, which physically scrapes sticky plaque from every curve of the tooth, especially just below the gumline.
This high degree of control makes it superior for navigating tight spaces where other tools can't fit. However, it requires dexterity and practice to master, especially for back molars.
Best For: Anyone willing to master the C-shape technique for the most thorough clean possible, especially those with tight teeth.
Actionable Tip: If your teeth are crowded, choose a waxed or "tape" style floss. The coating helps it glide smoothly without shredding or getting stuck.
Disposable Floss Picks: The Convenience King
For many, floss picks are the tool that finally made daily flossing achievable. These plastic tools feature a short piece of floss stretched between two prongs, making them easy to use with one hand. They are perfect for on-the-go use and are a great entry point for beginners.
The main drawback is that it's nearly impossible to create an effective C-shape. You also risk spreading bacteria since you're using the same small piece of floss for your entire mouth.
Best For: Individuals who prioritize convenience, travel often, or have dexterity challenges. Also great for beginners building the habit.
Actionable Tip: To minimize cross-contamination, rinse the floss pick under hot water after cleaning each gap to wash away some of the plaque.
The Bottom Line: Consistency is key. An "imperfect" tool used daily is more effective than the "perfect" tool used once a week. Choose the one that fits your lifestyle.
Water Flossers: The High-Tech Solution
Water flossers, or oral irrigators, use a pressurized stream of water to flush out food particles and plaque. Instead of scraping, they blast debris away, making them a powerful and gentle alternative.
These devices are especially useful for cleaning around dental work:
Braces: Cleans around brackets and under wires where string floss can't go.
Implants and Bridges: Flushes out hard-to-reach areas around and underneath restorations.
Sensitive Gums: The water stream is often more comfortable than string floss for those with gum sensitivity.
While excellent for removing loose debris, water flossers are less effective at removing the stubborn, sticky film of plaque compared to the mechanical scraping of string floss. For this reason, many people use both for the ultimate clean.
Best For: Individuals with braces, bridges, implants, or sensitive gums.
Actionable Tip: Start on the lowest pressure setting and gradually increase it as your gums adapt. Use lukewarm water to prevent temperature sensitivity.
Flossing Tools At a Glance
Use this table to quickly compare the tools and decide which is right for you.
Flossing Tool | Best For | Pros | Cons |
|---|---|---|---|
Traditional String Floss | The most thorough clean, especially for tight teeth. | Maximum Control: The "C" shape removes the most plaque. Affordable & Accessible: Widely available and inexpensive. | Learning Curve: Requires dexterity and can be tricky to use on back teeth. |
Disposable Floss Picks | Convenience, travel, and beginners. | Easy to Use: Can be handled with one hand. Portable: Perfect for on-the-go cleaning. | Less Effective: Hard to create a "C" shape. Hygiene Concerns: Can transfer plaque between teeth. |
Water Flossers | Braces, implants, bridges, and sensitive gums. | Cleans Dental Work: Excellent for orthodontics and restorations. Gentle on Gums: Less irritating for sensitive tissue. | Less Plaque Removal: May not remove all sticky plaque. Cost & Size: More expensive and requires counter space/power. |
Ultimately, the best option is the one you will use consistently. Experiment to find what works for you—you might even find that a combination, like a water flosser in the morning and string floss at night, is the perfect routine.
Flossing with Braces, Bridges, and Implants: A How-To Guide
Flossing around dental work like braces, bridges, or implants requires a specific technique to protect your investment and keep your gums healthy. The hardware creates new ledges and gaps where plaque can accumulate, increasing your risk for cavities and gum inflammation. Your old flossing routine won't be enough—here are the techniques that will.
How to Floss with Traditional Braces
The archwire running across your teeth blocks the normal path of floss. The solution is a floss threader—a flexible plastic loop that acts like a needle to guide the floss.
Here is your step-by-step action plan:
Prep Your Floss: Cut an 18-inch piece of floss and thread about five inches through the loop of the floss threader.
Thread Under the Wire: Guide the stiff point of the threader under your archwire between two brackets. Pull it through until the floss is under the wire.
Clean Both Teeth: Drop the threader. Wrap the floss into a C-shape around one tooth and slide it up and down, cleaning under the gumline. Repeat for the neighboring tooth.
Remove and Repeat: Gently pull the floss out from the side. Pick up the threader and move to the next set of teeth.
This method is the best way to clean around brackets and prevent white spots from forming on your teeth.
Navigating a Dental Bridge
A dental bridge consists of two crowns anchoring one or more artificial teeth (pontics). Because the teeth are connected, you must clean underneath the artificial tooth where it meets the gums.
Use a specialized floss like Super Floss, which has a stiff end for threading.
Thread It: Use the stiff end to guide the floss through the space between the bridge and your gums.
Scrub Underneath: Pull the spongy section back and forth to scrub the underside of the pontic and clean the sides of the supporting teeth.
Floss Other Teeth: Use the regular floss end for any teeth not part of the bridge.
Actionable Insight: Cleaning under a bridge is critical for the health of your supporting teeth and the lifespan of the bridge. Learn more in our guide on what is a dental bridge and how it can restore your smile.
Caring for Dental Implants
While a dental implant can't get a cavity, the gum tissue around it can become infected if plaque builds up—a condition known as peri-implantitis.
Your goal is to clean the base of the implant where the crown meets the gumline. A water flosser is excellent for flushing debris from around the implant crown. For removing sticky plaque, use a physical floss. Many patients find that a woven or spongy floss works best, as it effectively scrubs the implant surface without being too harsh.
Common Flossing Mistakes to Avoid
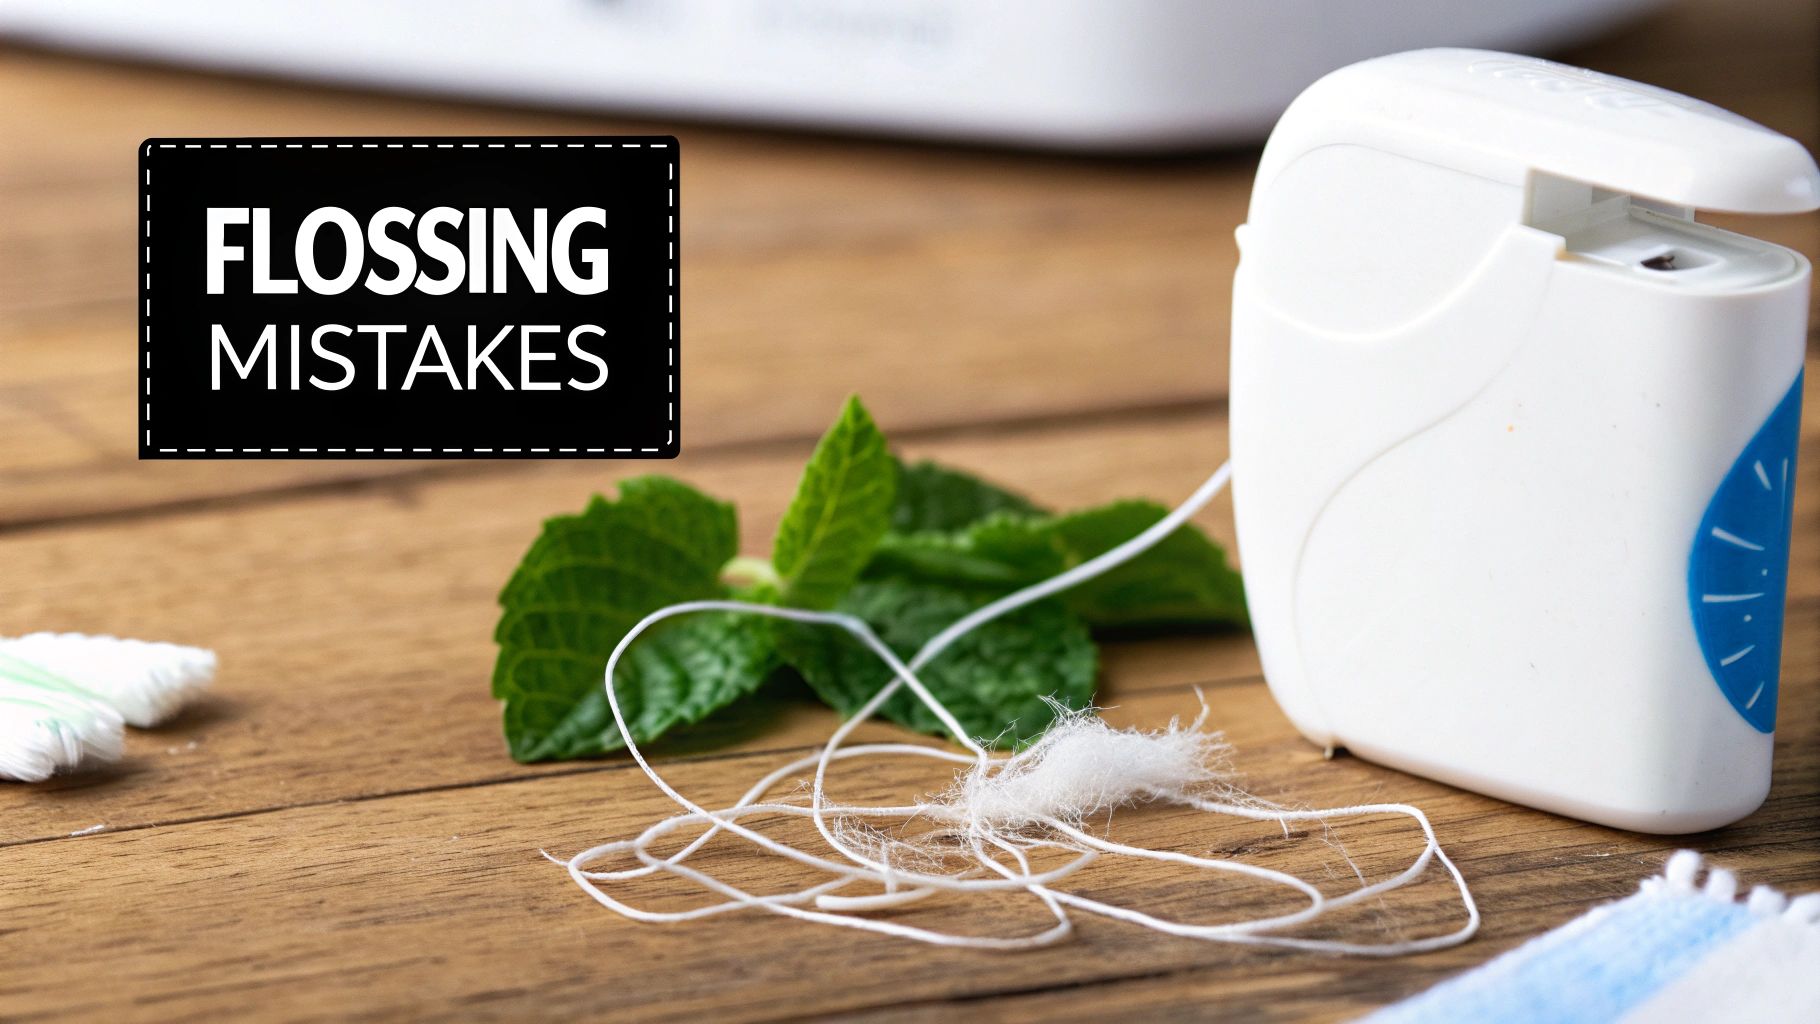
Even with the right technique, it's easy to fall into bad habits. These common mistakes can make your efforts less effective. The good news is they are all easy to fix.
Flossing Too Aggressively
More force does not equal a better clean. Snapping the floss hard against your gums can cause pain, bleeding, and even gum recession over time.
Instead of forcing the floss down, gently work it between your teeth with a soft, sawing motion. The goal is to ease it into place.
Key Takeaway: Flossing should feel like a gentle massage for your gums. If it hurts, you’re pushing too hard. Ease up and let the floss do the work.
When you only brush, you're missing 30–40% of tooth surfaces. Research in the National Library of Medicine confirms that consistent daily flossing is one of the best ways to reduce the need for future dental work.
Reusing the Same Section of Floss
Using the same couple of inches of floss for your entire mouth just moves plaque from one tooth to another. This is why you start with a generous 18-inch piece. As you clean each tooth, wind the used section onto one finger and release a fresh, clean section from the other. This ensures you are actually removing debris, not just relocating it.
Only Flossing When Something Is Stuck
While flossing is great for removing a stuck piece of popcorn, its main purpose is to fight the invisible enemy: plaque. Plaque is the sticky film of bacteria that constantly forms on your teeth. If not removed daily, it hardens into tartar. Waiting until you feel something stuck is like only washing your hands when they’re visibly dirty—you're ignoring all the germs you can't see.
Ignoring the Back Molars
Your molars do most of the chewing and are often neglected during flossing because they're hard to reach. These back teeth are prime areas for plaque buildup.
Make a conscious effort to reach every tooth:
Work the floss around both sides of every single tooth.
Pay special attention to the back-facing side of your very last molars on both the top and bottom.
Being thorough is essential for preventing cavities and gum disease throughout your entire mouth.
Stopping Because Your Gums Bleed
Seeing blood can be alarming, but in most cases, it’s a sign that you need to floss more, not less. Bleeding is usually a symptom of gingivitis, an inflammation caused by plaque along the gumline.
When you start flossing regularly, you remove that irritating plaque. The bleeding should decrease and stop completely within a week or two as your gums become healthier. If bleeding is heavy or persists beyond two weeks, contact your dentist.
Your Flossing Questions Answered
Here are clear answers to the most common questions about flossing to help you feel confident in your daily routine.
Does It Matter If I Floss Before or After Brushing?
The most important thing is that you floss daily. However, for maximum effectiveness, floss before you brush.
Flossing first dislodges plaque and food particles, clearing the way for your toothbrush and fluoride toothpaste to reach these newly cleaned surfaces. That said, consistency is what matters most. If flossing after you brush helps you stick to the habit, do that. A consistent daily routine is more powerful than the "perfect" order done inconsistently.
Actionable Insight: The best time to floss is whenever you will actually do it. Don't let the "before or after" debate prevent you from building a daily habit.
Is It Normal for Gums to Bleed When I Start Flossing?
Yes, it is very common to see a little blood when you first start flossing. This is usually a sign of mild gum inflammation (gingivitis) caused by the plaque you are now removing.
Do not stop flossing. The bleeding is a sign that your gums need more attention. As you continue to floss gently and consistently every day, the inflammation will subside. The bleeding should stop completely within one to two weeks as your gums heal. If bleeding is heavy or continues past two weeks, schedule a visit with your dentist.
Are Water Flossers as Good as Traditional Floss?
Water flossers are excellent tools, especially for cleaning around braces, bridges, and implants. They use a pressurized stream of water to flush out food particles and are gentle on the gums.
However, for removing the sticky film of plaque that clings to teeth, most dental professionals agree that traditional string floss is superior. The physical scraping action of wrapping the floss in a "C" shape is unbeatable for dislodging stubborn plaque.
For the ultimate clean, consider using both:
Water Flosser: To flush out larger debris and clean around dental work.
String Floss: To mechanically scrape away sticky plaque.
How Often Should I Really Be Flossing?
The American Dental Association recommends flossing at least once every day. Plaque begins to build up on your teeth within 24 to 48 hours and hardens into tartar if not removed. Once it becomes tartar, only a dental professional can remove it.
Making flossing a daily habit is one of the most effective actions you can take for your oral and overall health. For more answers, check out our guide covering frequently asked questions about oral care habits.
At Beautiful Dentistry, we believe a healthy smile is built on great daily habits. If you have more questions about your flossing technique or want to schedule a comprehensive exam to ensure your gums are in top shape, our team is here to help. Call us today to book your visit.https://zdentist.com


Comments