

The Proper Way to Floss for a Truly Healthy Smile
- Caterina Rutter
- Dec 11, 2025
- 12 min read

To floss effectively, start with 18 inches of floss—enough to use a clean section for each tooth. The key is to wrap the floss into a C-shape against each tooth and gently slide it just below the gumline to remove plaque your brush can't reach.
This technique is crucial because your toothbrush misses up to 40% of your tooth surfaces. Mastering this simple habit is your most effective step to prevent cavities and gum disease.
Why Your Flossing Technique Truly Matters
Brushing alone is an incomplete clean. It leaves a film of bacterial plaque in the tight spaces between your teeth and just under your gums, which is where most dental problems start.
When you don't remove this plaque, it hardens into tartar (or calculus), a substance so tough only a dental professional can scrape it off. This buildup is a direct cause of inflammation, cavities, and gum disease. A simple piece of floss is all it takes to break up and remove this plaque before it can cause real damage.
The Proven Impact on Oral Health
There's a night-and-day difference between a half-hearted flossing attempt and using the correct technique. Proper flossing isn't about yanking out a stray piece of food; it's a systematic cleaning of the sides of each tooth, one by one.
Long-term studies consistently back this up. Research has shown that people who floss regularly have far better oral health outcomes—we're talking fewer deep gum pockets, less decay, and even less tooth loss over their lifetime. You can see the data for yourself in this detailed five-year study from the National Institutes of Health. This is clear proof that spending a couple of minutes each day on proper flossing is one of the best preventive health decisions you can make.
More Than Just a Healthy Mouth
When you start to see flossing as a critical part of your routine, it stops feeling like a chore and becomes a powerful tool for your overall wellness. The benefits aren't just limited to your smile; they're closely linked to your systemic health, too.
Let's quickly recap what you gain by mastering this skill. This table breaks down the immediate and long-term advantages of getting your flossing technique right.
Quick Guide to Flossing Benefits
Benefit | Why It Matters for Your Health |
|---|---|
Prevents Gum Disease | It's your number one defense against gingivitis, the first stage of gum disease. |
Reduces Cavity Risk | Clears out plaque and food debris, starving the bacteria that cause cavities. |
Fights Bad Breath | Removes trapped, decaying food particles that are a primary source of bad breath. |
Protects Overall Health | A healthy mouth is linked to a lower risk of systemic issues like heart disease. |
What this all boils down to is that adopting the right flossing technique is a small investment with a huge payoff for your entire well-being.
The goal isn't just to go through the motions. The goal is to clean the sides of your teeth and the area below the gumline—places your brush will never touch. This targeted cleaning is what makes all the difference.
Ultimately, understanding the why behind flossing makes adopting the how a whole lot easier. To explore this topic further, you can discover more about the advantages of flossing your teeth in our detailed guide.
Mastering the C-Shape Flossing Technique
If you're just snapping floss between your teeth and yanking it out, you're missing the most important step. The real work of flossing happens below the gumline, and for that, you need a specific, dentist-approved motion: the C-Shape technique.
This method physically scrapes away the sticky, invisible film of bacteria called plaque that your toothbrush can't reach.
Getting Set Up for a Perfect Clean
Before you begin, set up your hands to give you the control you need to be both gentle and effective.
Action 1: Get the Right Length: Pull off about 18 inches of floss. You need this much to use a fresh section for each tooth, preventing you from moving plaque from one spot to another.
Action 2: Establish a Solid Grip: Wind most of the floss around the middle finger of one hand, and a small amount around the middle finger of your other hand. Use your thumbs and index fingers to guide a tight, one- to two-inch section of floss.
This grip is key. It gives you the precision to navigate tight spots without snapping the floss down onto your gums. As you clean a space, simply unwind a fresh section from one finger while spooling the used part onto the other.
Executing the C-Shape Motion
Once you're holding the floss correctly, it’s time to get to work. Remember, the goal is a gentle glide, not an aggressive sawing motion.
First, carefully guide the floss between two teeth. If it's a tight squeeze, use a soft, back-and-forth rubbing motion to ease it through. Never snap it down, as this can bruise or cut your gums.
Here is the most important part: once the floss is at the gumline, wrap it into a tight "C" shape against the side of one of the teeth. This forces the floss to make maximum contact with the tooth surface.
The C-shape isn't just about cleaning between your teeth; it's about cleaning below the gumline. This is where harmful plaque builds up and kicks off gingivitis. That curve lets you slide the floss gently into the small pocket between the tooth and gum—the sulcus—to scoop out hidden bacteria.
With the "C" formed, gently slide the floss up and down against the side of the tooth, moving from just below the gumline up toward the chewing surface. Do this two or three times. Now, without pulling the floss out, pull it across to the neighboring tooth, form a new C-shape, and repeat the motion. This ensures you clean both sides of the contact before moving on.
As this graphic shows, this one simple action is a powerhouse for your oral and overall health.
It’s a clear visual reminder that flossing gets to all the places a brush can't, stopping problems before they start.
Making It a Habit: A Systematic Approach
To ensure you don't miss any spots, work your way around your mouth in a predictable pattern. Start with your upper teeth on the far right and work your way to the left, then do the same for the bottom.
Follow these action tips as you go:
Don't Forget the Backs: The back surface of your very last molar on each side (top and bottom) is a magnet for plaque. Make sure you wrap the floss around the back of those teeth, too.
Keep it Clean: Unwind a fresh section of floss for each new gap. Reusing a dirty piece just re-deposits bacteria.
Be Gentle and Patient: Seeing a little blood when you first start flossing properly is normal. This should stop within a week or two as your gums get healthier. If it continues, see your dentist.
Consistency will always beat intensity. A gentle but thorough flossing session every day is what delivers real results. With a bit of practice, the C-Shape will become second nature.
Choosing Your Flossing Tool: A Practical Guide
The best flossing tool is the one you will use every single day. The dental care aisle can be overwhelming, but understanding what each tool is for makes the choice clear.
The growing variety of tools is a great thing. As more people understand the importance of cleaning between teeth, the market has responded. The global dental floss market was valued at USD 1.26 billion in 2023 and is projected to grow. This trend, detailed in this full dental floss market analysis, means you have more options than ever to find your perfect fit.
The Gold Standard: Traditional String Floss
When a dentist talks about the proper way to floss, this is usually what they mean. Traditional string floss is effective, affordable, and widely available.
Waxed Floss: Recommended for most beginners. The light wax coating helps it slide easily between tight teeth and makes it less likely to shred. It's a great choice if you have crowded teeth or crowns.
Unwaxed Floss: Thinner than waxed floss, this type can provide a "squeaky clean" feeling. However, it is more likely to fray, especially between very tight teeth.
Dental Tape: A broad, flat ribbon of floss. It is ideal if you have wider gaps between your teeth, as the extra surface area provides a more efficient clean.
The primary advantage of string floss is its flexibility, which allows you to create a tight "C-shape" to hug every curve of the tooth and clean thoroughly below the gumline. The main drawback is that it requires manual dexterity.
The most effective tool is useless if it just sits in the drawer. Don't feel pressured to use traditional floss if another tool helps you stay consistent. The goal is daily plaque removal, no matter how you do it.
The Convenience King: Floss Picks
Floss picks—small plastic handles with a piece of floss stretched across them—are popular for their convenience. They're great for flossing on the go, for people with dexterity challenges, or for anyone who finds wrapping string floss a hassle.
However, it’s nearly impossible to use the proper C-shape technique with a rigid pick. You also risk moving bacteria from one tooth to the next by using the same tiny piece of floss for your whole mouth. If you use picks, look for ones with flexible handles that allow better angling. To see how flossing fits into a larger strategy, check out our guide on maintaining good dental health.
Specialized Tools: Interdental Brushes and Water Flossers
Sometimes, string floss isn't the right tool for the job. For certain situations, specialized tools are essential. This table breaks down common tools to help you find what works for your unique smile.
Flossing Tools Comparison: Which Is Right for You?
Tool Type | Best For | Pros | Cons |
|---|---|---|---|
String Floss | Most people with standard tooth spacing. | Highly effective at scraping plaque; affordable; widely available. | Requires manual dexterity; can shred in tight spaces. |
Floss Picks | On-the-go cleaning; people with limited dexterity. | Convenient and easy to use; disposable. | Hard to use the C-shape technique; can spread bacteria. |
Interdental Brushes | Braces, bridges, implants, and wide gaps. | Excellent for cleaning around hardware; easy to grip. | Needs to be the right size for the gap; not for tight contacts. |
Water Flossers | Braces, sensitive gums, and as a supplement. | Great for flushing debris and reducing inflammation. | Doesn't physically remove sticky plaque; requires electricity/batteries. |
Ultimately, the best choice depends on what feels right and what gets the job done for you.
Interdental BrushesThese tiny pipe cleaner-like brushes are designed to be gently pushed into the space between teeth. They work wonders for:
Cleaning around braces, bridges, and dental implants.
People with larger gaps between their teeth where floss feels ineffective.
Anyone with arthritis or dexterity issues who finds them easier to hold than string floss.
Water FlossersAlso known as oral irrigators, these devices shoot a pulsating stream of water to flush out plaque and food particles. They are a fantastic tool for anyone with extensive dental work like braces or permanent bridges.
While studies confirm they are excellent for reducing gingivitis, most dentists agree they should supplement, not replace, manual cleaning. The physical scraping action of floss or an interdental brush is still the most reliable way to remove sticky plaque.
Try a few different options to see what feels most comfortable and effective. A quick chat with your dental hygienist at your next appointment can also provide a personalized recommendation.
Common Flossing Mistakes and How to Fix Them
Even with daily flossing, it's easy to fall into bad habits. These common mistakes are simple to fix once you know what to look for.
The Sawing Motion vs. The Gentle Glide
Mistake: Aggressively "sawing" the floss back and forth to force it between teeth. This can irritate or cut your gums and doesn't effectively remove plaque.
The Fix: Think "glide," not "saw." Gently work the floss between your teeth with a soft, rubbing motion. Once it passes the tight spot, focus on hugging the side of the tooth in a C-shape to scrape plaque away.
Forgetting to Go Below the Gumline
Mistake: Snapping the floss between your teeth and pulling it straight out. This misses the most critical area: the pocket just below where your gums meet your teeth, called the sulcus, where harmful bacteria hide.
The Fix: After gliding the floss between the teeth, gently guide it just beneath the gumline until you feel slight resistance. It shouldn't hurt. Use the C-shape to scoop out the hidden plaque your toothbrush cannot reach.
We know that nearly 42% of adults aged 30 and over have some form of gum disease. Cleaning below the gumline is your single most powerful defense against becoming part of that statistic.
Reusing the Same Section of Floss
Mistake: Using the same small piece of floss for your entire mouth. This just moves plaque and bacteria from one spot to another.
The Fix: Start with about 18 inches of floss. As you clean each gap, unwind a fresh section from one finger while wrapping the used bit onto the other. This ensures you're always using a clean surface to remove plaque, not just relocate it.
What About Bleeding Gums?
Seeing pink in the sink can be alarming, but don't stop flossing.
When It’s Normal: If you're new to flossing, a little bleeding indicates existing gum inflammation from plaque. Continue a gentle daily routine, and the bleeding should stop within a week or two as your gums heal.
When It’s a Red Flag: If bleeding is heavy, painful, or doesn't stop after two weeks of consistent, gentle flossing, book an appointment with your dentist. This can be a sign of more advanced gum disease.
Fixing these common mistakes will transform your flossing routine into a powerful tool for your health.
Flossing with Braces, Implants, or Sensitive Gums
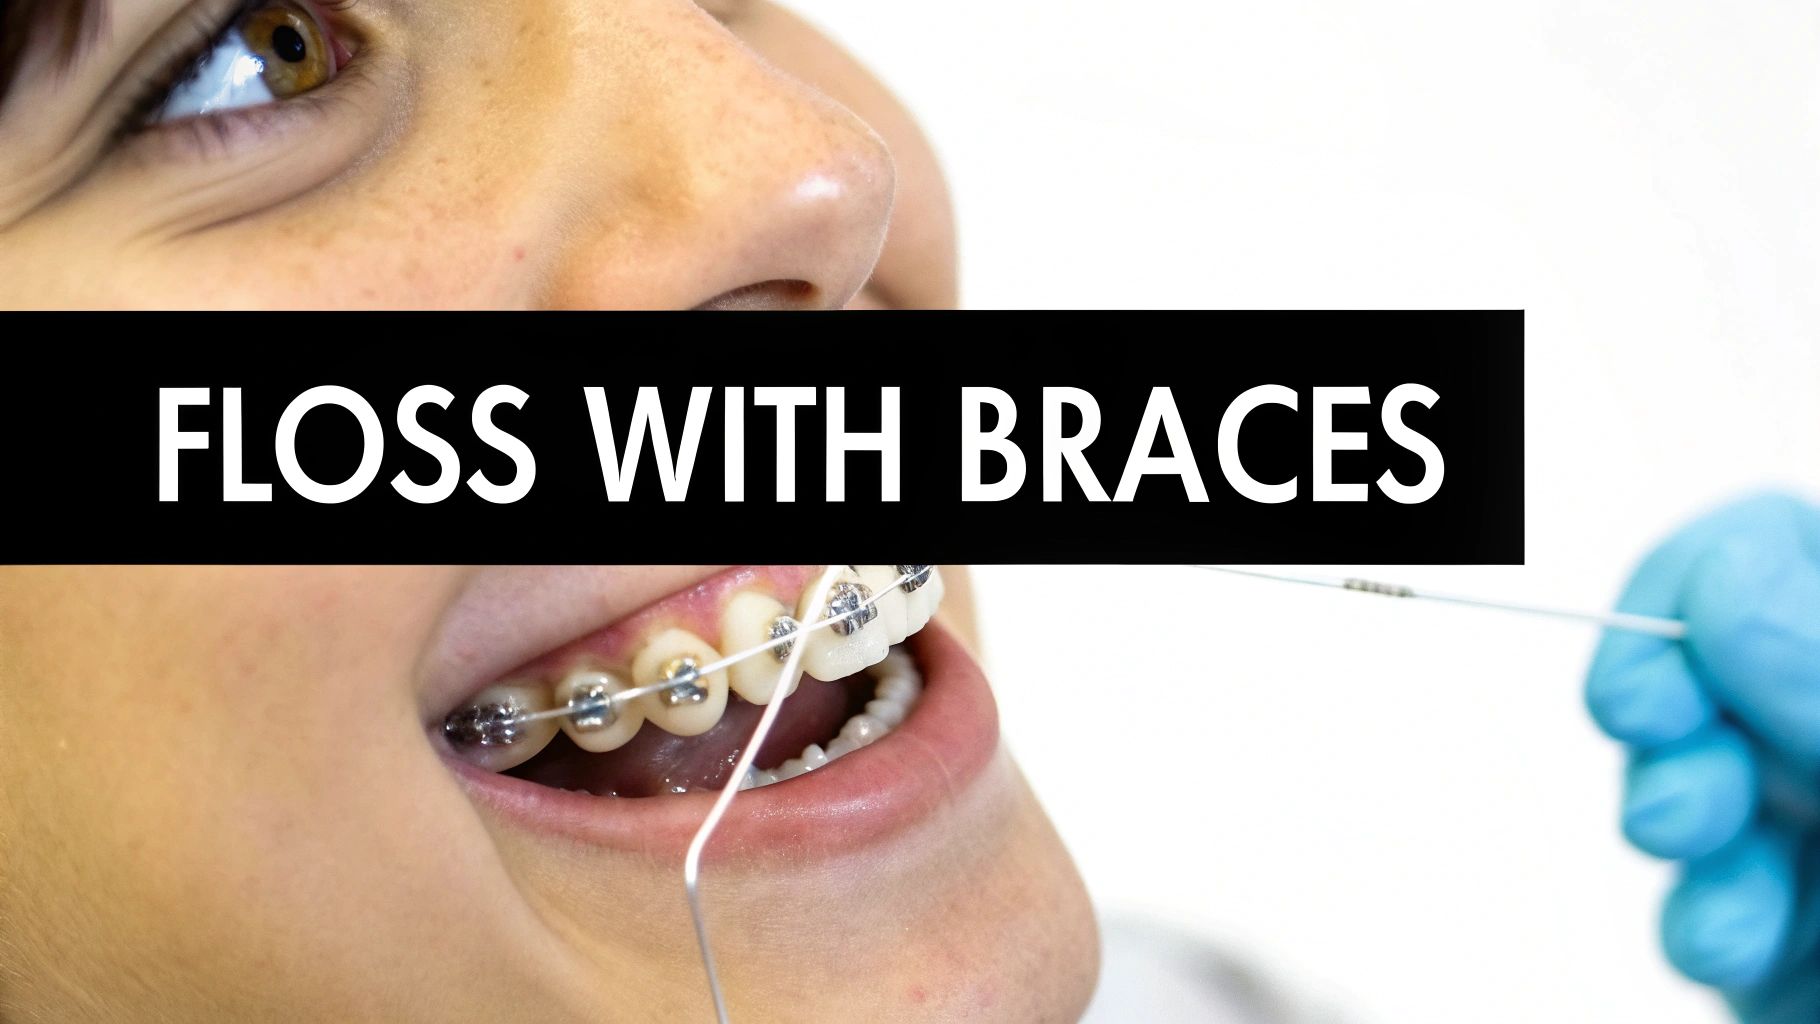
If you have braces, dental implants, or sensitive gums, your daily cleaning routine needs a more specialized game plan. Adapting your technique is crucial for your long-term oral health.
Navigating Braces and Wires
Flossing with braces is critical for preventing stains and decay around the brackets and wires. The best tool for this job is a floss threader.
A floss threader is a small, flexible plastic loop that helps you guide floss under your orthodontic wire.
Thread it up: Pull about 18 inches of floss through the threader's loop.
Guide it under: Gently push the pointed end of the threader underneath your orthodontic wire and pull it through until the floss is on the other side.
Floss as normal: Let go of the threader. Use the floss to make a C-shape around each tooth and clean below the gumline.
Repeat: Pull the floss out and use the threader to move to the next pair of teeth.
It sounds tedious, and at first, it will be. But skipping this is a huge mistake. Food and plaque get trapped by brackets like magnets, making them a leading cause of cavities and puffy, sore gums during orthodontic treatment. Those few extra minutes a day are protecting your investment in a beautiful, straight smile.
Protecting Your Dental Implants
Keeping dental implants clean is key to making them last a lifetime. The area where the implant meets your gum tissue is vulnerable to bacteria, which can lead to peri-implantitis—gum disease for implants.
To clean around an implant, focus on the base of the crown. A water flosser is excellent for flushing debris from this crevice. For manual cleaning, use specialized implant floss, which often has a stiff end for easy threading and a spongy section for cleaning. Gently wrap the spongy part around the base of the implant and use a soft back-and-forth motion to wipe away plaque.
Soothing Sensitive and Receding Gums
If your gums are sensitive or receding, be exceptionally gentle to avoid more pain and damage. Standard string floss may feel too harsh.
Try these gentler alternatives:
Soft Floss or Dental Tape: These are wider and have a softer, cushioned texture that is kinder to sensitive tissue.
Water Flossers: Using a water flosser on a low-pressure setting cleans between teeth without the friction of string. It can reduce inflammation while still being effective.
If your gums bleed every time you floss, it’s a sign of inflammation. For more tips, check our guide on how to stop your gums from bleeding for actionable steps. The goal is to clean effectively without causing pain.
We Get These Questions All the Time
Here are answers to the most common practical questions we hear from patients.
Floss Before or After Brushing?
The short answer from dental professionals is: floss first.
Flossing before you brush loosens plaque and food particles, which your toothbrush then sweeps away. This also clears the path for fluoride in your toothpaste to reach the surfaces between your teeth.
However, consistency is what truly matters. If you are more likely to remember to floss after brushing, do that. Flossing after is infinitely better than not flossing at all.
Why Are My Gums Bleeding When I Floss?
Bleeding is usually a sign that your gums need more attention, not less. It's a classic symptom of gingivitis, the earliest stage of gum disease, caused by plaque buildup irritating the gum tissue.
When you first start a consistent flossing routine, some bleeding is common as you begin clearing out bacteria. Keep flossing gently every day, and the bleeding should stop within a week or two as your gums heal and become stronger.
If the bleeding is heavy, painful, or doesn't stop after two weeks of daily, gentle flossing, it's time to book an appointment. That could point to a more serious issue that needs a professional look to get your gums healthy again.
Can I Reuse a Piece of Floss?
No. You should never reuse a piece of dental floss.
As you clean, the floss picks up plaque and bacteria. Using that same section on another tooth simply moves germs from one area to another. Used floss also shreds and loses its strength, making it less effective. Always start with a fresh piece, about 18 inches long, and use a clean section for every tooth.
What’s the Best Time of Day to Floss?
The best time to floss is whenever you will do it consistently. However, the ideal time is right before bed.
Your saliva production, which naturally cleans your mouth, drops while you sleep. By flossing and brushing before bed, you remove plaque and food from the day so it can't cause damage overnight.
The main goal is to clean between your teeth at least once every 24 hours. Find the time that fits your life and make it a non-negotiable habit to protect your smile.
At Beautiful Dentistry, we believe a healthy smile is built on great habits and personalized care. If you have more questions or want to make sure your oral hygiene routine is perfect for you, our team in Tempe, AZ, is here to help. We offer everything from comprehensive exams to advanced cosmetic and restorative treatments in a comfortable, welcoming environment. Schedule your visit today and take the next step toward a lifetime of confident smiles. Learn more and book your appointment at https://zdentist.com.


Comments