

The Correct Way to Floss for Better Oral Health
- Caterina Rutter
- Dec 4, 2025
- 9 min read

The secret to flossing correctly isn't about snapping the floss between your teeth—it's about the gentle C-shape motion you use to clean below the gumline. Mastering this technique transforms a daily chore into your best defense against gum disease and hidden plaque.
Why Mastering Flossing Is Non-Negotiable
Flossing isn't an optional extra; it's a critical step your toothbrush can't handle. Think of it this way: brushing cleans the visible surfaces of your teeth, but flossing is what cleans the tight spaces between them and under your gums.
Those areas are where plaque—a sticky, bacterial film—builds up undisturbed. When you let it sit, it hardens into tartar, leading directly to cavities and gum inflammation (gingivitis).
Your toothbrush simply can't reach these spots. Skipping this step is like washing only 65% of your body and calling it a day. The real goal is to eliminate the invisible threats before they cause problems.
Beyond Bad Breath and Cavities
The consequences of neglecting this step extend far beyond your mouth. When gum disease progresses, it can create a pathway for harmful bacteria to enter your bloodstream, impacting your overall health. Ignoring proper oral hygiene can lead to serious issues; you can read more about potential dental complications like abscesses after root canals.
Actionable Tip: Reframe flossing as a proactive investment in your long-term health, not just a dental chore. This mindset makes it easier to build a consistent habit.
This growing awareness is even showing up in market trends. The global dental floss market is expected to hit USD 1,121.6 million by 2032, which tells you people are finally getting the message about good oral hygiene and looking for tools that make it easier.
Ultimately, mastering the art of flossing is about taking control. It’s a two-minute action that helps you avoid complex and expensive dental problems down the road. We dive deeper into the advantages of flossing your teeth in our comprehensive guide.
Mastering the C-Shape Flossing Technique
If you just saw the floss up and down between your teeth, it's time for an upgrade. The correct way to floss relies on the C-Shape method to effectively disrupt the harmful plaque that builds up below your gumline. This technique targets the hidden sulcus—the tiny pocket where the tooth meets the gum—which a quick in-and-out motion completely misses.
Step 1: Get the Setup Right
Proper preparation gives you the control needed to clean effectively without causing irritation.
Measure It Out: Start with 18 inches of floss. This ensures you have a fresh section for each tooth, preventing the spread of plaque.
Wrap for Control: Loosely wrap most of the floss around one middle finger (your supply reel). Wrap the remaining end around the middle finger on your other hand (your take-up reel).
Create Your Grip: Pinch a taut one- to two-inch section between your thumbs and index fingers. This gives you precise control to guide the floss.
This setup is crucial. As you clean a tooth, wind the used section onto your take-up finger and unspool a fresh piece from your supply.
The goal isn't just to clean between your teeth, but to clean the sides of each tooth individually. This shift in mindset is crucial for effective plaque removal and preventing gum inflammation.
Step 2: Execute the C-Shape Motion
Be deliberate and gentle. You are not forcing anything; you are making firm contact with the tooth surface.
Guide the Floss: Gently guide the floss between two teeth. If the space is tight, use a light back-and-forth "sawing" motion. Never snap the floss down onto your gums, as this can cause damage and recession over time.
Form the "C": Once at the gumline, curve the floss into a snug "C" shape against the side of one tooth, wrapping it around as much as possible. The floss should hug the tooth’s surface.
Clean the Surface: Gently slide the floss from just below the gumline to the top of the tooth. Repeat this up-and-down motion 2-3 times to scrape away the plaque film.
Switch Sides: Lift the floss over the triangle of gum (the papilla) and press it against the neighboring tooth. Form another C-shape and repeat the cleaning motion.
This diagram shows exactly why this is so important. It illustrates how simple plaque buildup, if not removed, can spiral into serious gum disease and even affect your overall health.
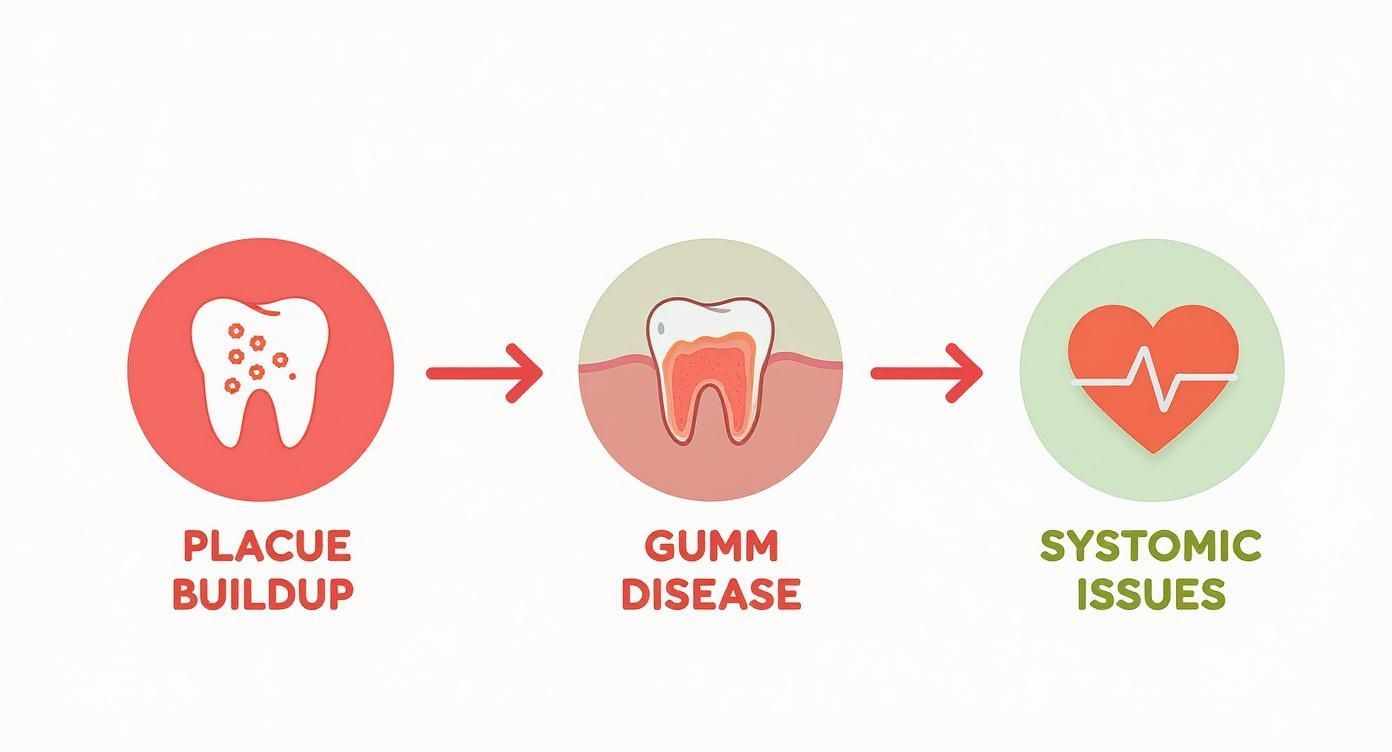
When plaque is left to fester, it causes inflammation that can create pathways for bacteria to enter your bloodstream, which is why prevention is everything.
Finding the Right Flossing Tool for You
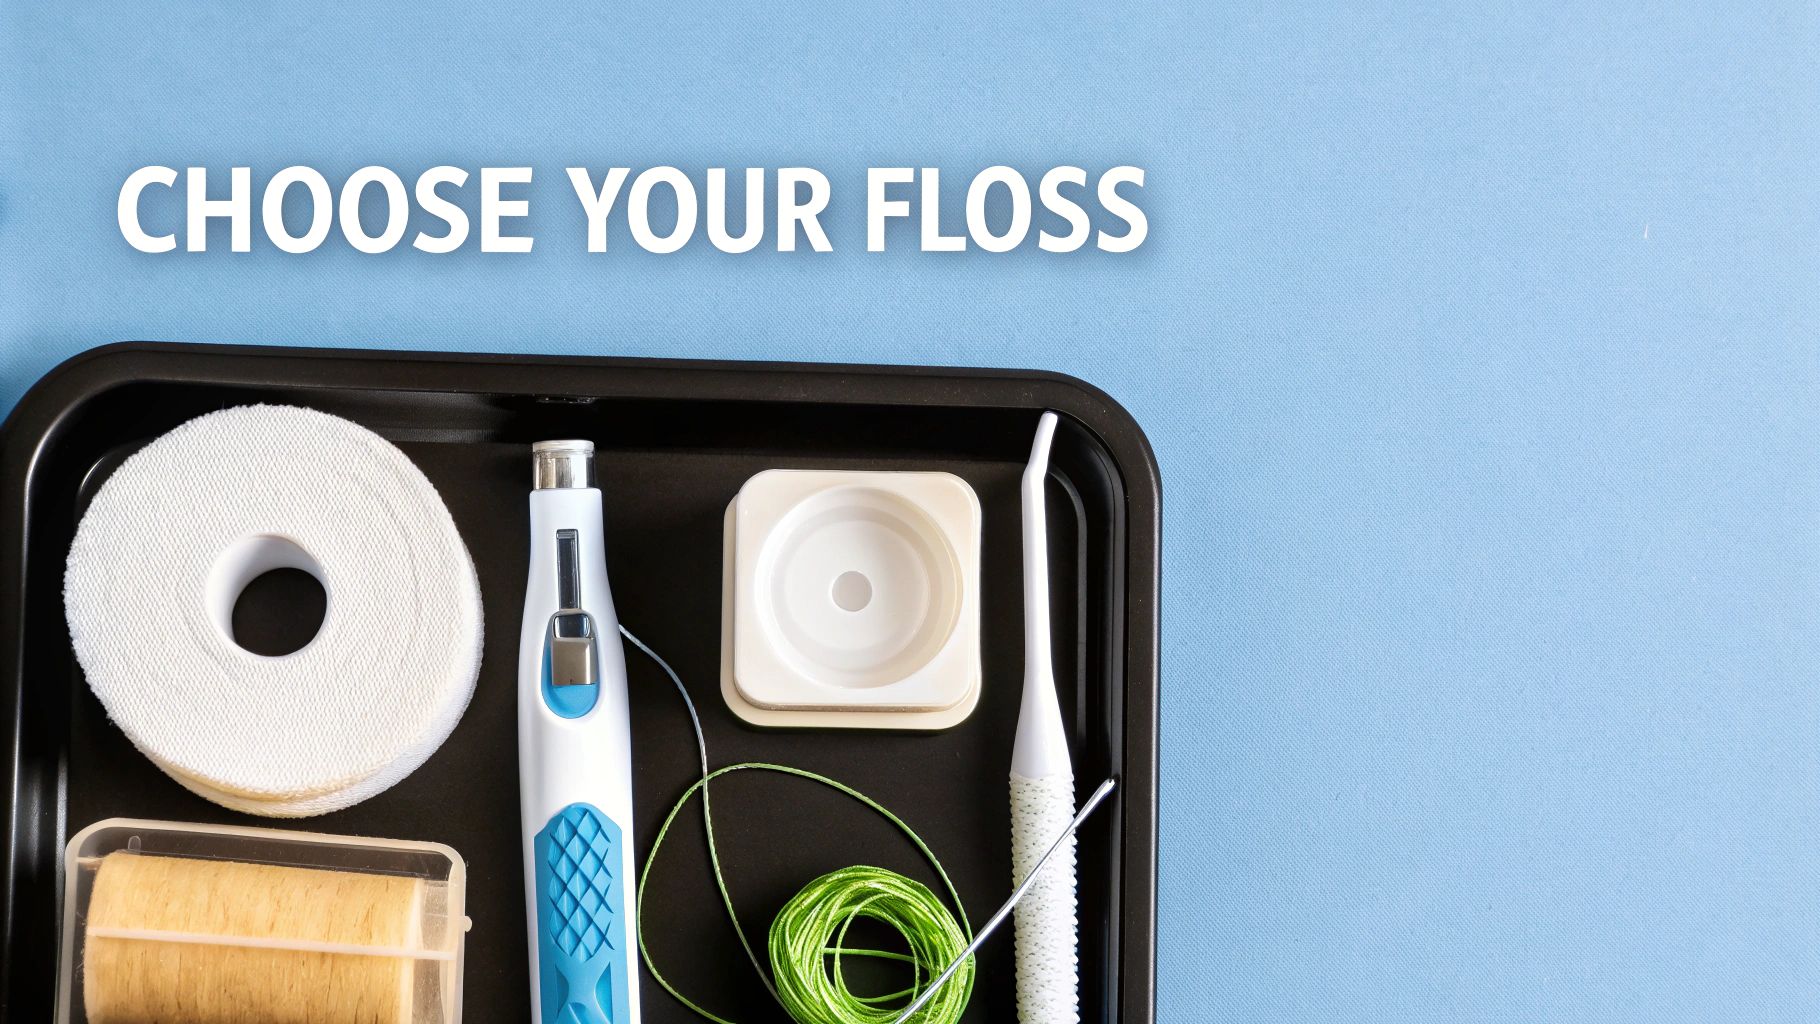
The best flossing tool isn't the most high-tech one; it's the one you'll use every day. Find what feels comfortable for your mouth and fits your lifestyle to ensure you stay consistent.
The Classics: String Floss and Dental Tape
For most people, traditional string floss remains the most effective tool. It’s affordable, accessible, and excellent at scraping away plaque.
Waxed Floss: Use this if you have tight teeth. The wax coating helps it glide smoothly without shredding or getting stuck.
Unwaxed Floss: This thin nylon floss can provide a "squeaky clean" feel and may grip plaque slightly better, but it's more likely to fray in crowded spaces.
Dental tape is simply a wider, flatter version of floss. Choose this if you have larger gaps between your teeth or are cleaning around bridgework, as the increased surface area makes cleaning more efficient.
Modern Convenience: Floss Picks and Water Flossers
If traditional flossing feels cumbersome, modern tools can help you stay on track.
Floss picks are plastic wands with a small piece of floss. They are ideal for on-the-go cleaning or for those with dexterity challenges. However, it's difficult to form the necessary C-shape with a pick, and you risk spreading plaque if you use the same one for your entire mouth.
Actionable Tip: While water flossers are excellent for removing food debris and massaging gums, they do not mechanically scrape away the sticky film of plaque like string floss. Use them as a supplement, not a replacement.
Water flossers, like the popular Waterpik, use a pulsating stream of water to clean between teeth. I highly recommend them for anyone with:
Braces, permanent retainers, or other orthodontic work
Dental implants or bridges
Sensitive gums or deep gum pockets
For the ultimate clean, use traditional floss first to break up plaque, then follow with a water flosser to flush away the debris.
Which Flossing Tool Is Right for You?
Use this table to find the best tool for your specific needs.
Tool | Best For | Pros | Cons |
|---|---|---|---|
String Floss | Most people with standard dental anatomy. | Very effective at scraping plaque, affordable, widely available. | Can be tricky to handle, may shred in tight spaces. |
Dental Tape | People with wider gaps between teeth or bridges. | Covers more surface area, less likely to snap. | Can be too thick for tight contacts. |
Floss Picks | On-the-go cleaning, people with dexterity issues. | Extremely convenient, easy to use with one hand. | Difficult to form a C-shape, can spread plaque. |
Superfloss | Braces, bridges, and implants. | Stiffened end for easy threading, spongy section for cleaning. | Can be more expensive and takes practice to use. |
Floss Threaders | Getting floss under braces, bridges, and retainers. | Inexpensive, allows use of any regular floss. | Adds an extra step to the flossing process. |
Water Flosser | Orthodontics, implants, gum disease, sensitive gums. | Excellent for flushing debris, stimulates gums, easy to use. | Doesn't remove sticky plaque as well as string, requires power/water. |
The goal is consistency. Experiment to find the tool that makes flossing easiest for you to do every single day.
Flossing with Braces, Bridges, and Implants
Dental work is a major investment, but it creates new challenges for daily cleaning. Navigating around wires, under bridges, and between implants requires special tools to prevent decay and gum disease that could compromise your investment.
Think of dental hardware as creating new hiding spots for plaque. Standard floss can't reach these areas, making specialized tools essential.
How to Floss with Braces
The archwire on braces blocks normal flossing. Your essential tool here is a floss threader—a flexible plastic loop that acts like a needle to guide floss.
Here's the step-by-step process:
Take 18 inches of floss and thread about five inches through the loop of the threader.
Carefully guide the pointed end of the threader under your archwire.
Pull the threader through until the floss is under the wire.
Remove the threader and use the C-shape method to clean the sides of both teeth and under the gumline.
Pull the floss out and repeat for the next tooth.
This prevents the white spots and cavities that often appear after braces are removed.
Cleaning Under Bridges and Around Implants
Bridges and implants create a space between the artificial tooth and your gums where bacteria thrive. This area is impossible to clean with a toothbrush or standard floss. Neglecting it can lead to inflammation, infection, or implant failure.
The best tool for this job is superfloss, which has three components:
A Stiff End: Acts as a built-in threader to get under the bridge or around the implant.
A Spongy Section: A thicker part designed to scrub the underside of the bridge or the sides of the implant post.
Regular Floss: The end section for cleaning adjacent natural teeth.
Actionable Step: Thread the stiff end through, then use the spongy section in a gentle back-and-forth motion to wipe plaque from the underside of the appliance and where it meets the gums.
Adding these tools to your routine is non-negotiable for protecting the health and longevity of your dental work.
Common Flossing Mistakes You Might Be Making
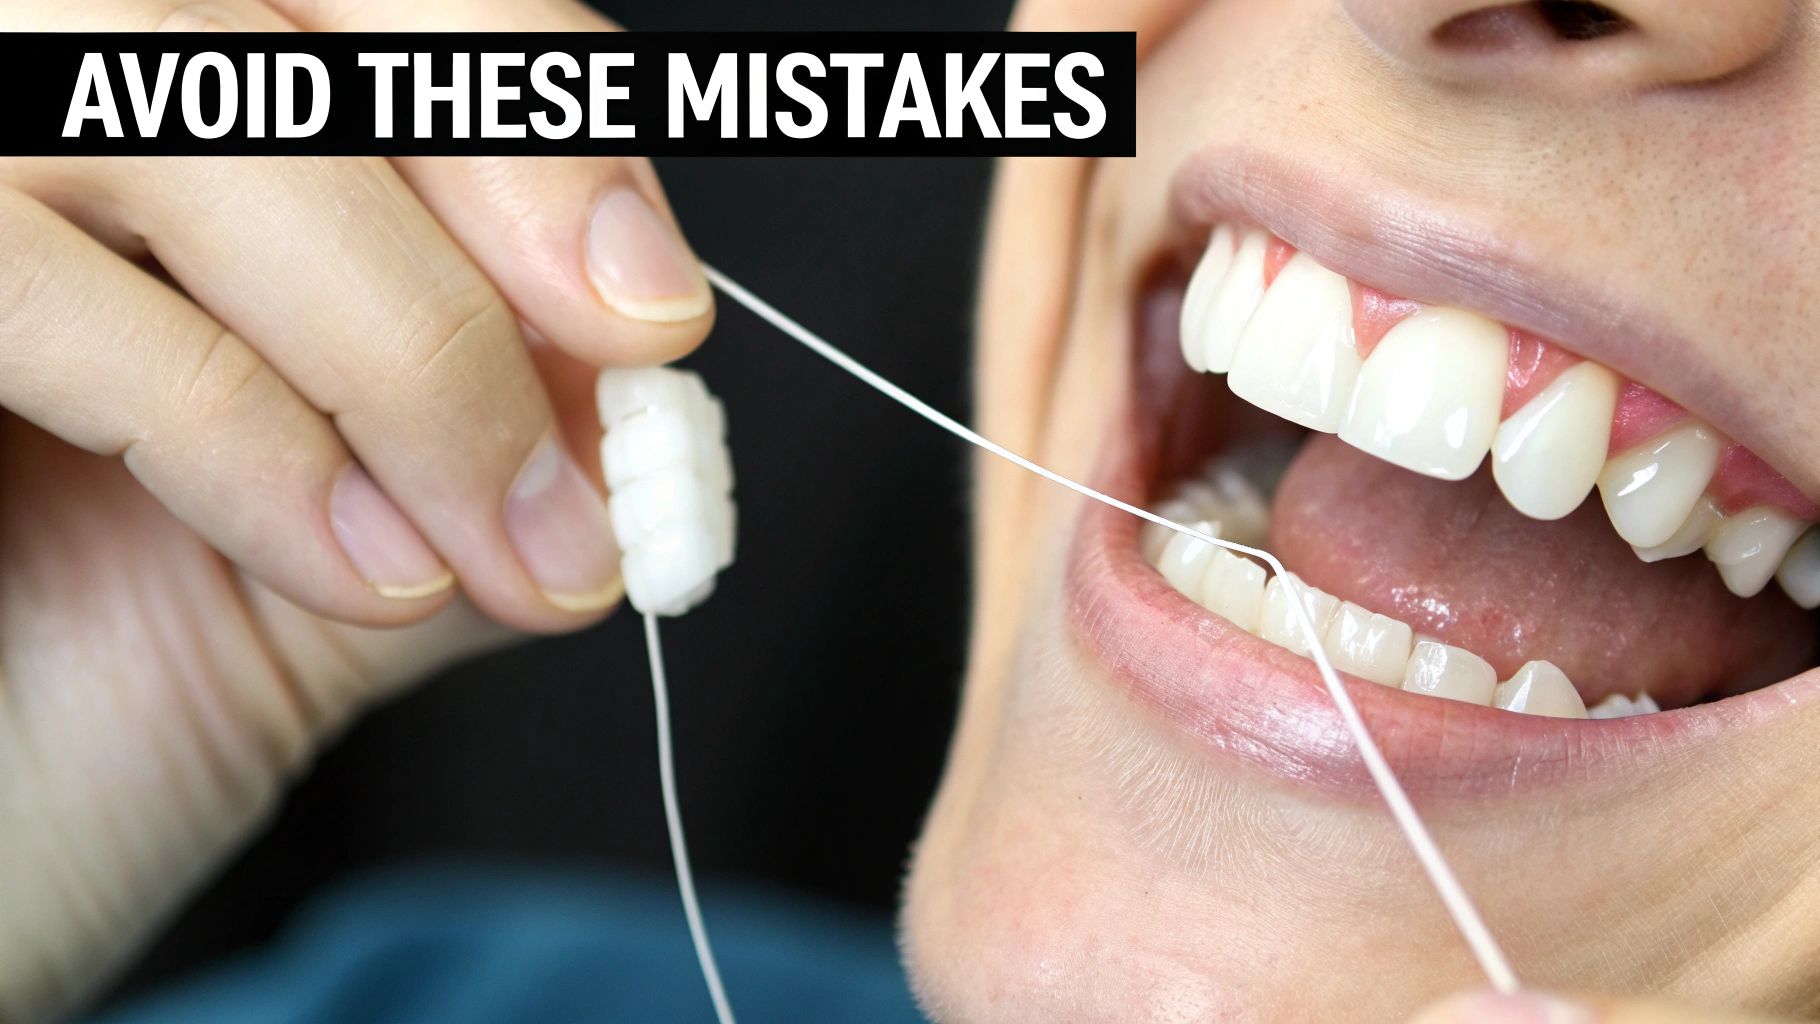
Even with good intentions, it's easy to adopt ineffective or harmful flossing habits. Review these common mistakes to ensure your efforts are paying off.
The most common error is using an aggressive "sawing" motion. While a gentle wiggle helps ease floss between tight teeth, sawing against your gums causes irritation and recession over time.
Similarly, snapping the floss down into your gums can be painful and expose sensitive tooth roots. Always guide the floss gently into place.
Are You Just Spreading Plaque Around?
Here’s a critical mistake that undermines your entire effort: reusing the same section of floss for your whole mouth. This doesn't clean your teeth; it just relocates plaque and bacteria from one area to another.
Actionable Tip: To remove plaque, not just move it, you must advance to a fresh, clean section of your 18-inch floss for each new space between teeth. This single change dramatically improves your cleaning effectiveness.
It’s a small detail, but it’s what separates a real cleaning from just going through the motions.
Overlooking the Signs of Gum Irritation
Seeing blood in the sink might make you want to stop flossing, but don't. That bleeding is usually a sign that your gums are inflamed from the very plaque you're trying to remove. Quitting is the opposite of what you should do.
Gentle persistence is key: Continue to floss daily with a gentle C-shape motion. The bleeding should stop within a week or two as your gums become healthier.
When to seek help: If bleeding is heavy or doesn't improve after two weeks of consistent, gentle flossing, schedule an appointment with your dentist. For more on this, check out our guide on how to stop your gums from bleeding.
As people become more aware of oral health, daily flossing is on the rise. Projections show that by 2026, 70% of Americans will floss daily, a huge jump driven by public health education. You can discover more insights about dental floss market trends to see how habits are changing.
Your Flossing Questions Answered
Even with perfect technique, questions come up. Here are clear, actionable answers to the most common ones we hear.
Should I Floss Before or After Brushing?
The most effective sequence is to floss before you brush.
Flossing first dislodges plaque and food particles from between your teeth. When you follow up with your toothbrush, you sweep away that loosened debris. This also allows the fluoride in your toothpaste to reach and protect the surfaces between your teeth more effectively.
Is It Normal for My Gums to Bleed?
Yes, a little bleeding is common and often expected when you first start a consistent flossing routine. It's a sign of mild gum inflammation (gingivitis) caused by the plaque you're now removing.
Actionable Insight: Don't let bleeding stop you. It's a signal that your gums need flossing. With gentle, daily C-shape flossing, the bleeding should subside within one to two weeks as your gums heal.
If the bleeding is heavy, painful, or persists beyond two weeks, contact your dentist. This may indicate a more advanced issue that needs professional attention. For a thorough evaluation, you can learn more about professional dental cleaning and exams to get your gums back on track.
How Often Should I Floss My Teeth?
Floss once every day. The American Dental Association (ADA) recommends this frequency to consistently disrupt plaque before it can harden into tartar, which typically takes 24-48 hours.
The time of day doesn't matter—morning, noon, or night. Just pick a time that you can stick with and make it a non-negotiable part of your daily routine.
At Beautiful Dentistry, our team is here to help you get a healthy, confident smile with honest advice and care that's right for you. If you have more questions or you're due for a check-up, visit us at zdentist.com to schedule your appointment.


Comments